Wednesday, March 30, 2016
Thursday, March 24, 2016
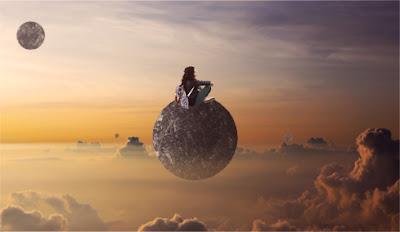
this is my finished product. the girl i used is kang seulgi from a girl group called Red Velvet. i knew i wanted to use her because in their new music video, One of These Nights, there are many surreal moments. i initially wanted to recreate one of them, but i couldn't find any good source images. i just went to google and grabbed cool looking images.
Wednesday, March 9, 2016
Tuesday, March 8, 2016
Monday, March 7, 2016
Friday, March 4, 2016
Wednesday, March 2, 2016
this is my final product. i only added a few simple touch ups from yesterdays version to make it look better. i chose to use that girl because it looks like she doesnt care that meteors are literally coming straight at her. i didnt have much trouble with this other than the fact that i couldnt get the coloring of the background quite right.
Tuesday, March 1, 2016
Monday, February 29, 2016
Friday, February 26, 2016
Thursday, February 11, 2016
Monday, February 8, 2016
Tuesday, February 2, 2016
Friday, January 29, 2016
Friday, January 22, 2016
this is my vintage poster. as you can see i chose a squirrel head, mostly because i look like a squirrel. i decided against using inspirational words and used the opposite. i didnt quite understand the patterns part of the tutorial so i did my own thing. i just put the images behind the main paper layer and erased pieces out of it.
Tuesday, January 19, 2016
this is my "Inner Me" project. I chose Shrek because i don't want any one in my swamp. I made this masterpiece by putting myself into the sidewalk image along with Shrek. i then desaturated him and connected him to my feet. next i turned his transparency down and stretched him out a bit. lastly i desaturated the rest of the image to make it seem deep and meaningful but in reality its a picture of me and Shrek. why am i like this?
Wednesday, January 6, 2016
I used all of the tools in the tutorial. I accidentally forgot to revert the apple back to red though
I just made it orange !!?!??!?!??!??! The other part of this tutorial was pointless so I didn't put the picture.
I selected the people with the oval then I did the feather thing then I removed the white oval and here they are.
I just selected the moon and put it in the picture with the elliptical marquee tool
I lassoed the hands then I copy and pasted them into a picture
I used the polygonal lasso to select the billboard then I pasted the women into it
I selected the school using the polygonal lasso tool then I selected the inverse and pasted the sky into it.
I selected the dude with the magnetic lasso then I copy and pasted him into the backgroung picture.
I selected the sky with the magic wand tool then copy and pasted the clouds into the selected area.
I selected the person and the gourds with the quick select tool then i selected the inverse and made brown.
I followed the tutorial but when i converted the file the box was removed? but i promise i did it
i didnt understand the point of the next tutorial and didnt know what to do with it.
ive already done this so i did the same thing
I did my own method with this one. i selected all of the roses then i inverted the selection and desaturated the picture
Subscribe to:
Comments (Atom)


